Featured

RHCSA RHEL 8 – Practice on the go

This video details how to make use of a Virtual Private Server (VPS) to practice the RHCSA whilst on the go.

To get to the Hostinger VPS use the special link here to get 60% off: https://hostinger.com/csg

PuTTY from here: https://www.chiark.greenend.org.uk/~sgtatham/putty/latest.html

KiTTY here:

https://www.fosshub.com/KiTTY.html

Notes from the video:

Get ready to upgrade

# yum -y install https://dl.fedoraproject.org/pub/epel/epel-release-latest-7.noarch.rpm

# yum -y install rpmconf yum-utils

Resolve all config stuff.

# rpmconf -a

Packages you might not need/require, remove if something doesn’t seem to be required.

# package-cleanup --leaves

# package-cleanup --orphans

Install DNF.

# yum -y install dnf

Remove yum

# dnf -y remove yum yum-metadata-parser

# rm -Rf /etc/yum

Update the system

# dnf -y upgrade

Install new versions:

# dnf -y upgrade http://mirror.bytemark.co.uk/centos/8/BaseOS/x86_64/os/Packages/centos-release-8.0-0.1905.0.9.el8.x86_64.rpm

Upgrade EPEL

# dnf -y upgrade https://dl.fedoraproject.org/pub/epel/epel-release-latest-8.noarch.rpm

Dnf clean

# dnf clean all

Remove definitely conflicting stuff.

# rpm -e --nodeps sysvinit-tools

Try to run the upgrade

# dnf -y --releasever=8 --allowerasing --setopt=deltarpm=false distro-sync

Process new configs

# rpmconf -a

Ensure kernel is properly installed

# rpm -e kernel-core dnf -y install kernel-core

Install the new packages that is in the Core/Minimum Install:

# dnf -y groupupdate "Core" "Minimal Install"

RHCSA RHEL 8 – Create, delete, and modify local groups and group memberships

Your support on Ko-Fi is much appreciated:

👉 https://ko-fi.com/csg_yt

Recommended RHCSA book:

📔 Amazon AU: https://amzn.to/2X5FL98

Buy CSG Merchandise:

👉 http://tee.pub/lic/csg

More information on Sophos Home Antivirus:

👉 http://bit.ly/SophosHP

More information about Hostinger VPS:

👉 http://bit.ly/H-VPS

Join our new discord channel:

👉 https://discord.gg/kBQ6Jry

This video is based on RHEL 8. Video to cover the section ‘Create, delete, and modify local groups and group memberships’ for the RHCSA (Red Hat Certified System Administrator).

More information on the required learning: http://bit.ly/rhcsa8

Notes from the video:

To create a new group:

# groupadd IT

You can define the Group ID (GID) via -g:

# groupadd -g 3032 IT

You can delete a group using:

# groupdel IT

To update the group name:

# groupmod -n IT IT-Support

To update the group ID (GID) of a group:

# groupmod -g 3033 IT-Support

To add an addtional group to a user account:

# usermod -aG IT-Support user1

To list the group members of a specific group:

# groupmems -l -g IT-Support

To remove a user from a group run:

# gpasswd -d user1 IT-Support

RHCSA RHEL 8 – Change passwords and adjust password aging for local user accounts

Your support on Ko-Fi is much appreciated:

👉 https://ko-fi.com/csg_yt

Recommended RHCSA book:

📔 Amazon AU: https://amzn.to/2X5FL98

Buy CSG Merchandise:

👉 http://tee.pub/lic/csg

More information on Sophos Home Antivirus:

👉 http://bit.ly/SophosHP

More information about Hostinger VPS:

👉 http://bit.ly/H-VPS

Join our new discord channel:

👉 https://discord.gg/kBQ6Jry

This video is based on RHEL 8. Video to cover the section ‘Change passwords and adjust password aging for local user accounts’ for the RHCSA (Red Hat Certified System Administrator).

More information on the required learning: http://bit.ly/rhcsa8

Notes from the video:

The tool to change a users password is passwd, and is used as following:

# passwd

This would change the current users password, to change another users password:

# passwd user1

The password expiry values are managed by the chage tool, to view a users password expiry information run:

# chage -l user1

To set a users password to expire in 30 days:

# chage -M 30 user1

To force a user to change thier password on next login:

# chage -d 0 user1

To set an account to expire:

# chage -M -1 user1

Set an account to never expire:

# chage -E -1 user1

You can walk through all these changes one by one using:

# chage user1

The default configuration for the password expiration is stored in:

/etc/login.defs

RHCSA RHEL 8 – Create, delete, and modify local user accounts

Your support on Ko-Fi is much appreciated:

👉 https://ko-fi.com/csg_yt

Recommended RHCSA book:

📔 Amazon AU: https://amzn.to/2X5FL98

Buy CSG Merchandise:

👉 http://tee.pub/lic/csg

More information on Sophos Home Antivirus:

👉 http://bit.ly/SophosHP

More information about Hostinger VPS:

👉 http://bit.ly/H-VPS

Join our new discord channel:

👉 https://discord.gg/kBQ6Jry

This video is based on RHEL 8. Video to cover the section ‘Create, delete, and modify local user accounts’ for the RHCSA (Red Hat Certified System Administrator).

More information on the required learning: http://bit.ly/rhcsa8

Notes from the video:

Users are added to the system using the following command:

# usermod user1

As part of running the usermod command it gives the user a unique UID (user ID number) and creates a group of the same name with its own GID (group ID number).

To specify the UID and GID at user creation run:

# useradd -u 1001 -g 1002 user1

To create a new group run:

# groupadd IT

To create a new user and add it to that group:

# useradd -G IT user1

To delete a user:

# userdel user1

To delete a user and their home directory:

# userdel -r user1

To rename a user:

# usermod -l user2 user1

To update the password of a user:

# passwd user1

RHCSA RHEL 8 – Restrict network access using firewall-cmd/firewall

Your support on Ko-Fi is much appreciated:

👉 https://ko-fi.com/csg_yt

Recommended RHCSA book:

📔 Amazon AU: https://amzn.to/2X5FL98

Buy CSG Merchandise:

👉 http://tee.pub/lic/csg

More information on Sophos Home Antivirus:

👉 http://bit.ly/SophosHP

More information about Hostinger VPS:

👉 http://bit.ly/H-VPS

Join our new discord channel:

👉 https://discord.gg/kBQ6Jry

This video is based on RHEL 8. Video to cover the section ‘Restrict network access using firewall-cmd/firewall’ for the RHCSA (Red Hat Certified System Administrator).

More information on the required learning: http://bit.ly/rhcsa8

Notes from the video:

The local firewall on the server is managed by the firewall-cmd command line, the first area to learn is about zoning on the firewall. To list all of the zones run:

# firewall-cmd --get-zones

To see what is configured in a particular zone:

# firewall-cmd --zone work --list-all

To create a new zone use the following:

# firewall-cmd --new-zone servers

This new zone would be non-persistant, this is good practice incase you misconfigure something, you can reboot the server to clear the setting. Use –permanent to make rules persist e.g.:

# firewall-cmd --new-zone servers --permanent

Note any changes on the firewall will not have affect until you ask the service to reload:

# firewall-cmd --reload

Before assigning the network interface into a new zone, you should add any required services in to the zone to ensure they aren’t suddenly blocked, a good example would be SSH.

# firewall-cmd --zone servers --add-service ssh --permanent

The zone is now ready to have the network card added to it:

# firewall-cmd --change-interface eth0 --zone servers --permanent


Finally, if you are happy with the configuration of the servers zone and wish to make that the default (use –permanent to make this persist):

# firewall-cmd --set-default servers

To view the zones currently assigned to each interface, use the –get-active-zones option:

# firewall-cmd --get-active-zones

If there are any additional services you would like to add to the firewall whitelist you can check the predefined services on the firewall:

# firewall-cmd --get-services

If you would like to add a pariticular service you can use the add-service option:

# firewall-cmd --add-service http --permanent

To remove a service:

# firewall-cmd --remove-service http --permanent

If there isn’t a pre-defined service you can also just add a individual port to the whitelist as follows:

# firewall-cmd --add-port 8080/tcp --permanent

To remove that port:

# firewall-cmd --remove-port 8080/tcp --permanent

RHCSA RHEL 8 – Configure network services to start automatically at boot

Your support on Ko-Fi is much appreciated:

👉 https://ko-fi.com/csg_yt

Recommended RHCSA book:

📔 Amazon AU: https://amzn.to/2X5FL98

Buy CSG Merchandise:

👉 http://tee.pub/lic/csg

More information on Sophos Home Antivirus:

👉 http://bit.ly/SophosHP

More information about Hostinger VPS:

👉 http://bit.ly/H-VPS

Join our new discord channel:

👉 https://discord.gg/kBQ6Jry

This video is based on RHEL 8. Video to cover the section ‘ConfConfigure network services to start automatically at boot’ for the RHCSA (Red Hat Certified System Administrator).

More information on the required learning: http://bit.ly/rhcsa8

Notes from the video:

There are two ways to capture this requirement, the first is to enable as service that uses the network on boot, for example httpd (apache):

Install httpd:

# dnf install httpd

Enable it on boot:

# systemctl enable httpd

Another example would be the Network Manager service:

# systemctl enable NetworkManager

The other method to capture this would be to enable a network card or connection on boot:

# nmcli connection modify eth0 connection.autoconnect yes

This will enable the connection upon system bootup, a no will disable it.

RHCSA RHEL 8 – Configure hostname resolution

Your support on Ko-Fi is much appreciated:

👉 https://ko-fi.com/csg_yt

Recommended RHCSA book:

📔 Amazon AU: https://amzn.to/2X5FL98

Buy CSG Merchandise:

👉 http://tee.pub/lic/csg

More information on Sophos Home Antivirus:

👉 http://bit.ly/SophosHP

More information about Hostinger VPS:

👉 http://bit.ly/H-VPS

Join our new discord channel:

👉 https://discord.gg/kBQ6Jry

This video is based on RHEL 8. Video to cover the section ‘Configure hostname resolution’ for the RHCSA (Red Hat Certified System Administrator).

More information on the required learning: http://bit.ly/rhcsa8

Notes from the video:

Hostnames

All machines in a network have in addition to an IP address, a hostname. The hostname is literally a name for the host.

To view the current hostname in short format:

# hostname -s

The view the fully qualified domain name (FQDN):

# hostname -f

To change the hostname edit the following file:

# vi /etc/hostname

To then force the update of the hostname run:

# hostnamectl

DNS

DNS or Domain Name Servers are special servers that provide resolution of a FQDN to an IP address. This allows to have the added benefit of not having to type in the IP address every time you want to connect to a network device.

To see the current configured DNS servers you can check the following file:

# cat /etc/resolv.conf

To add/update the DNS servers on an interface (this example eth0) run the following:

# nmcli con mod eth0 ipv4.dns "8.8.8.8 8.8.4.4"

To then force the read of this for configuration for DNS resolution run:

# nmcli con reload

# systemctl restart NetworkManager

To manually overwride what is configured on the DNS server with a local configuration you can edit the following file which acts as a local DNS server.

# vi /etc/hosts

An example entry would be:

172.28.18.3 RHEL8.local RHEL8

RHCSA RHEL 8 – Configure IPv4 and IPv6 addresses

Your support on Ko-Fi is much appreciated:

👉 https://ko-fi.com/csg_yt

Recommended RHCSA book:

📔 Amazon AU: https://amzn.to/2X5FL98

Buy CSG Merchandise:

👉 http://tee.pub/lic/csg

More information on Sophos Home Antivirus:

👉 http://bit.ly/SophosHP

More information about Hostinger VPS:

👉 http://bit.ly/H-VPS

Join our new discord channel:

👉 https://discord.gg/kBQ6Jry

This video is based on RHEL 8. Video to cover the section ‘Configure IPv4 and IPv6 addresses’ for the RHCSA (Red Hat Certified System Administrator).

More information on the required learning: http://bit.ly/rhcsa8

Notes from the video:

This section is on IP addressing. An Internet Protocol (IP) address is an individual address for a host on a network. When using the internet your IP address is assigned to you by your Internet Service Provider (ISP).

When using the device within your home network you will be assigned a local IP address by your router and then the router uses Network Address Translation (NAT) to translate your local address to your ISP provided address for use on the internet.

There are two types of IP address in use these days IPv4 and IPv6. IPv4 is still the most widely used, but is slated to be fully replaced by IPv6, just it is a massive task.

Therefore I will cover both.

IPv4

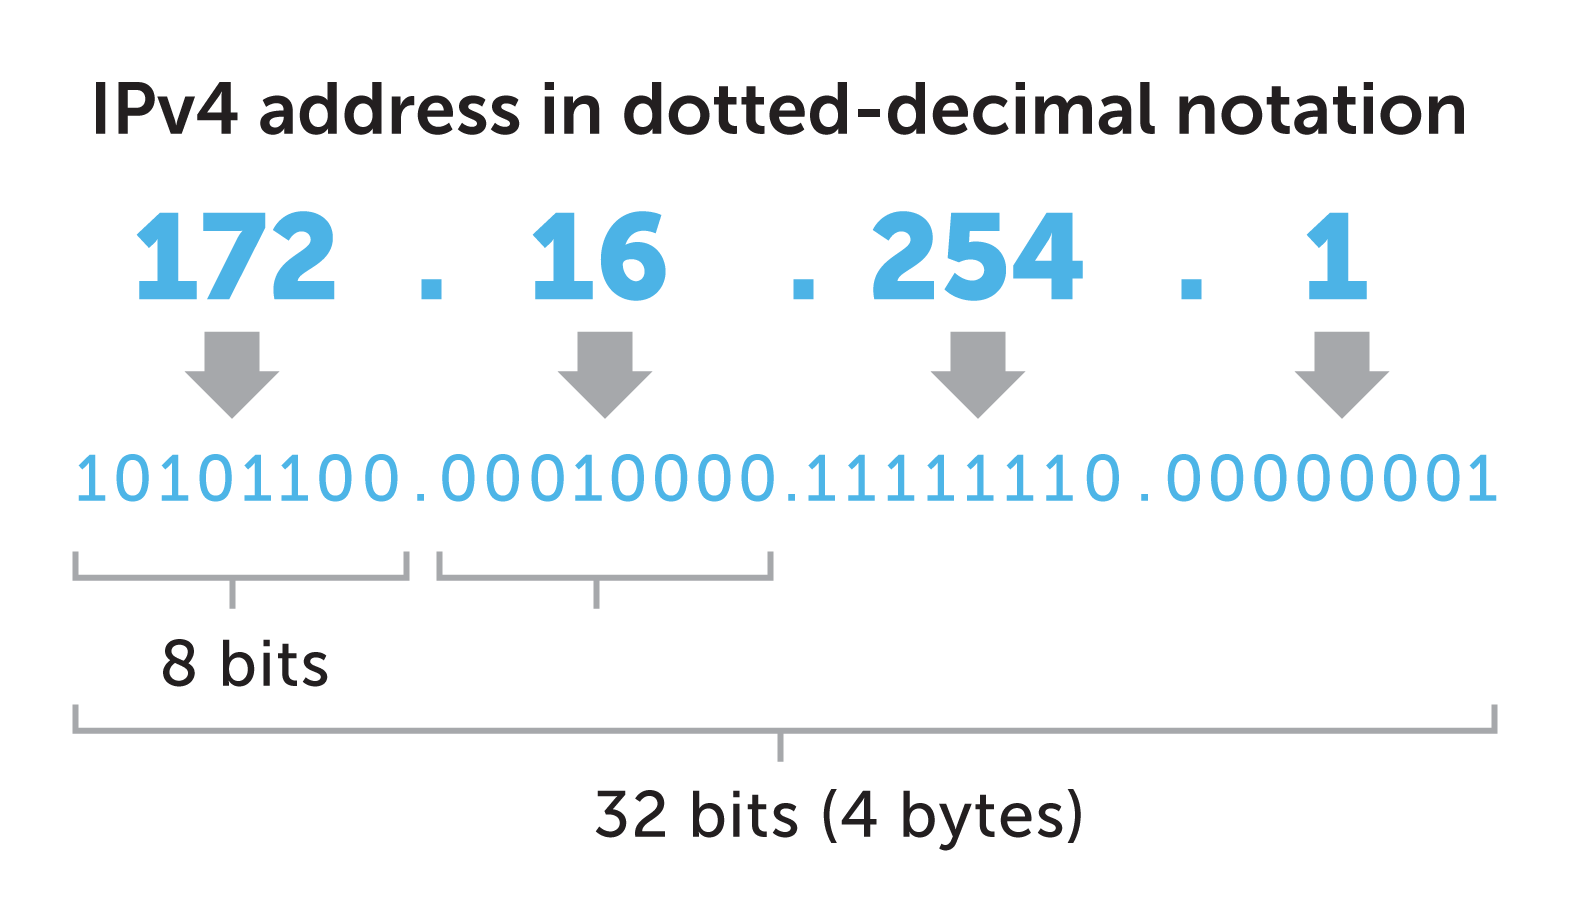
This IP addressing scheme is a 32 bit address (being 32 1s or 0s) using decimal numbers, split into 4 octets.

What is IPv4? Here's all you need to know | BlueCat Networks

As we can see the IP address in the above example is 172.16.254.1, this is what is caused a Class B address. As the table shows below IP addresses are split into different network intents, note there is unicast (one host to one server) and multicast (one host to multiple servers).

Class A 1.0.0.1 to 126.255.255.254 Supports 16 million hosts on each of 127 networks. 
Class B 128.1.0.1 to 191.255.255.254 Supports 65,000 hosts on each of 16,000 networks. 
Class C 192.0.1.1 to 223.255.254.254 Supports 254 hosts on each of 2 million networks. 
Class D 224.0.0.0 to 239.255.255.255 Reserved for multicast groups. 

Within these classes there are ranges assigned for private use of which we have included below. The subnet mask defines how large the network is, for example the network is 10.0.0.0 and the subnet mask is 255.0.0.0, the maximum value of an IP address is 255 so for the 10. octet it is masking, all of the other octets are able to go to their maximum values. So the IP address range is: 10.0.0.0 – 10.255.255.255, we can use any address in between e.g. 10.1.4.200. The CIDR is a way of expressing the subnet mask in short form, for example we can express the below class C network as 192.168.0.0/16.

ClassPrivate NetworksSubnet MaskCIDRNumber of IP Addresses
A10.0.0.0255.0.0.0/816,777,214
B172.16.0.0 – 172.31.0.0255.240.0.0/121,048,576
C192.168.0.0255.255.0.0/1665,534

The good thing is once you have the hang of Subnet Masks and CIDR it is again used in IPv6 so it’s not something you will have to learn again. All networks will have a gateway address (this is a router or switch that can redirect traffic intended for other networks) and a broadcast address (this is the address we use to send messages to multiple hosts on the same network for special types of requests).

Configuring a IPv4 Address

All of the configuration is completed via the nmcli application.

To show the connection information:

# nmcli connection show

To get the current status:

# nmcli device status

To get the current configuration:

# nmcli device show

To delete a device (don’t do to your active network interface!):

# nmcli connection delete enp0s3

To add a new connection for a new device (enp0s8):

# nmcli connection add con-name eth0 ifname enp0s8 type ethernet ip4 10.0.2.16/24 gw4 10.0.2.2

To check the configuration:

# nmcli connection show

# ip addr

# nmcli device show enp0s8

To bring an interface up:

# nmcli connection up eth0

To bring an interface down:

# nmcli connection down eth0

To manually configure an IP address:

# nmcli connection modify eth0 ipv4.address 10.0.2.15/24

# nmcli connection modify eth0 ipv4.gateway 10.0.2.2

# nmcli connection modify eth0 ipv4.method manual

IPv6

The addressing used in IPv6 is 128 bit and uses hexadecimal numbers, therefore has a much larger address space. This was due to IPv4 being too small for modern needs and now pretty much all of the IPs have been used. An example IPv6 address is as below.

IPv6 address - Wikipedia

IPv6 addresses are classless and therefore we have no class designation, however some prefixes (same as CIDR) are reserved for specific uses. Here are some common ones.

PrefixDesignationIPv4 equivalent
::ffff/96
Example: ::ffff:192.0.2.47
IPv4-mapped
Used to embed IPv4 addresses in an IPv6 address. One use for this is in a dual-stack transition scenario where IPv4 addresses can be mapped into an IPv6 address. See RFC 4038 for more details.
No IPv4 equivalent. However, you can search for the mapped IPv4 address in the relevant Whois Database.
2000::/3Global Unicast
The operators of networks using these addresses can be found using the RIR Whois servers listed in the IANA registry.
No equivalent single IPv4 block
ff00::.8
Example: ff01:0:0:0:0:0:0:2
Multicast
Used to identify multicast groups. They should only be used as destination addresses, never as source addresses.
224.0.0.0/4

IPv6 uses the same gateway, but doesn’t have any broadcast address, it’s as the protocol is more modern and no longer needs this functionaility.

Configuring an IPv6 Address

Using the same method as above to manage the connection, the only difference is when you come to configure the actual IP addressing.

To add a new connection for a new device (enp0s8):

# nmcli connection add con-name eth0 ifname enp0s8 type ethernet ip6 2006:ac81::1105/64 gw6 2006:ac81::1101

To manually configure an IP address:

# nmcli connection modify eth0 ipv6.addresses 2006:ac81::1105/64

# nmcli connection modify eth0 ipv6.gateway 2006:ac81::1101

# nmcli connection modify eth0 ipv6.method manual

RHCSA RHEL 8 – Modify the system bootloader

Your support on Ko-Fi is much appreciated:

👉 https://ko-fi.com/csg_yt

Recommended RHCSA book:

📔 Amazon AU: https://amzn.to/2X5FL98

Buy CSG Merchandise:

👉 http://tee.pub/lic/csg

More information on Sophos Home Antivirus:

👉 http://bit.ly/SophosHP

More information about Hostinger VPS:

👉 http://bit.ly/H-VPS

Join our new discord channel:

👉 https://discord.gg/kBQ6Jry

This video is based on RHEL 8. Video to cover the section ‘Modify the system bootloader’ for the RHCSA (Red Hat Certified System Administrator).

More information on the required learning: http://bit.ly/rhcsa8

Notes from the video:

As part of the exam you will be only asked to make a minor modification of the grub configuration.

To list the environment options for modification for grub:

# grub2-editenv list

A good example would be to set the current kernel as the default for boot:

# grub2-set-default 0

To view and modify the entire grub configuration for your system:

# vi /etc/default/grub

A simple variable you can modify to test is the GRUB_TIMEOUT_STYLE=countdown

You can simply add a new line in the file and add that entry, this will change the GRUB screen to only show a simple countdown rather than the full bootscreen.

To then apply the configuration:

# grub2-mkconfig -o /boot/grub2/grub.cfg

RHCSA RHEL 8 – Work with package module streams

Your support on Ko-Fi is much appreciated:

👉 https://ko-fi.com/csg_yt

Recommended RHCSA book:

📔 Amazon AU: https://amzn.to/2X5FL98

Buy CSG Merchandise:

👉 http://tee.pub/lic/csg

More information on Sophos Home Antivirus:

👉 http://bit.ly/SophosHP

More information about Hostinger VPS:

👉 http://bit.ly/H-VPS

Join our new discord channel:

👉 https://discord.gg/kBQ6Jry

This video is based on RHEL 8. Video to cover the section ‘Work with package module streams’ for the RHCSA (Red Hat Certified System Administrator).

More information on the required learning: http://bit.ly/rhcsa8

Notes from the video:

Modules allow you to install specific versions of a application, a good example of this would be the PHP application. The PHP application is available in the modules stream with multiple versions and editions, this allows you to select and install the specific version that is required.

To list all the currently available modules:

# dnf module list 

To list information about a specific module:

# dnf module info –profile php

To install a module:

# dnf module install php

To remove the module: 

# dnf module remove php

Then to reset the module post removal (if you would like to install a different version): 

# dnf module reset php 

To install a specific version and edition:

# dnf module install php:7.3/minimal 

RHCSA RHEL 8 – Install and update software packages from Red Hat Network, a remote repository, or from the local file system

Your support on Ko-Fi is much appreciated:

👉 https://ko-fi.com/csg_yt

Recommended RHCSA book:

📔 Amazon AU: https://amzn.to/2X5FL98

Buy CSG Merchandise:

👉 http://tee.pub/lic/csg

More information on Sophos Home Antivirus:

👉 http://bit.ly/SophosHP

More information about Hostinger VPS:

👉 http://bit.ly/H-VPS

Join our new discord channel:

👉 https://discord.gg/kBQ6Jry

This video is based on RHEL 8. Video to cover the section ‘Install and update software packages from Red Hat Network, a remote repository, or from the local file system’ for the RHCSA (Red Hat Certified System Administrator).

More information on the required learning: http://bit.ly/rhcsa8

Notes from the video:

Some people who have worked with Red Hat previously will be familiar with YUM, however as of RHEL8 it has been replaced by DNF, best to use this going forward even though the yum commands still work.

To search for a package:

# dnf search nano

# dnf list na*

To list both enabled and disabled repositories use the following command. A status column is added to the output list to show which of the repositories are enabled. 

# dnf repolist all

# dnf repoinfo

To view more information about a particular package:
# dnf info nano
 

To install packages using dnf: 

# dnf install nano

To remove a package:

# dnf remove nano

To find out what package provides a particular file:

# dnf provides "*/bin/nano"

To use dnf to install a local package use:

# dnf localinstall rpm

To list all the available package groups: 

# dnf groups list

To install a package group:
# dnf group install "System Tools" 

To remove a package group:
# dnf group remove "System Tools" 

To list all of the actions completed using dnf:
# dnf history list 

To undo a particular action:
# dnf history undo 4

To redo a particular action:

# dnf history redo 4 

To add a new repository on the system you need the following configuration as a minimum this would need to be in an existing or new file within /etc/yum.repos.d/ with the .repo extension:

[repository] 
name=repository_name 
baseurl=repository_url

Replace repository_url with a URL to the directory where the repodata directory of a repository is located: 
* If the repository is available over HTTP, use: http://path/to/repo 
* If the repository is available over FTP, use: ftp://path/to/repo 
* If the repository is local to the machine, use: file:///path/to/local/repo 

There is an automated tool to do the addition of repositories, yum-config-manager which is provided as part of dnf-utils. To install run:

# dnf install dnf-utils

To add an exsiting repository to the system use the following command:
# yum-config-manager --add-repo repository_url

To disable a repository:

# yum-config-manager --disablerepo repository

To enable a repository:

# yum-config-manager --enablerepo repository

Creating your own local repository, you need to firstly install the createrepo application:

# dnf install createrepo

2. Copy all packages that you want to have in your repository into one directory, such as /root/local_repo. 

3. Change to this directory and run the following command: 

# createrepo --database /root/local_repo

To then add the repo to dnf:

# yum-config-manager --add-repo file:///root/local_repo/

Design a site like this with WordPress.com
Get started